Speedy UK Deliveries
 100% SECURE PAYMENT
 VOLUME DISCOUNTS
 Contact us
Speedy UK Deliveries100% SECURE PAYMENTVOLUME DISCOUNTSContact us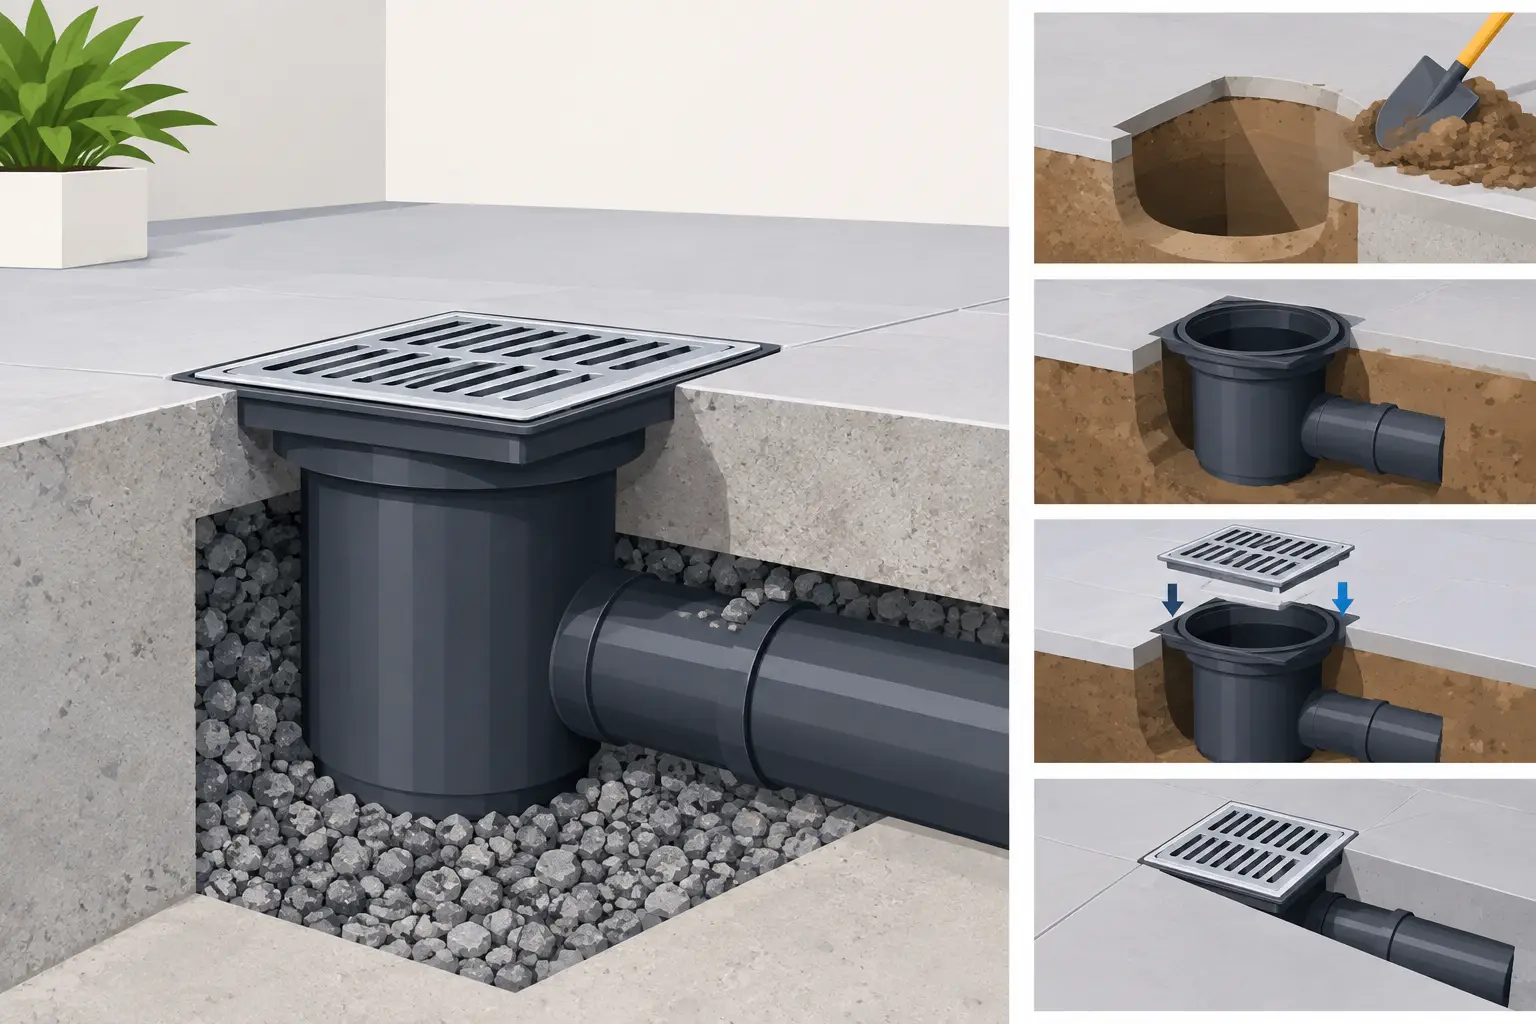
A bottle gully is a small component with a big job: it traps odours below ground while giving external wastewater a controlled route into the drainage system. If you are searching how to install 110mm bottle gully drainage, the key is not simply getting the gully upright. The outlet level, pipe fall, trap access and final surface finish all need to work together.
This guide covers the typical installation of a 110mm underground bottle gully serving an external waste connection, such as a kitchen, utility room or condensate discharge where suitable. Always check the gully manufacturer’s fitting arrangement before starting, as socket and spigot configurations, inlet options and grate styles can vary.
A bottle gully is a trapped underground drainage fitting, normally installed at ground level with a removable grid or grate at the top. The internal water seal prevents smells from the foul drain travelling back through the gully. It also provides a practical collection point for wastewater from an external waste pipe.
The 110mm connection refers to the underground drainage outlet, designed to connect with standard 110mm plastic drainage pipe and fittings. The waste inlet is often smaller and may require a purpose-made adaptor, depending on whether the incoming pipe is 32mm, 40mm or 50mm. Do not rely on mastic or improvised packing to make this connection watertight.
Bottle gullies are commonly used where an above-ground waste pipe leaves the building at low level. They are not a substitute for deciding where the discharge should go. In properties with separate drainage systems, wastewater must connect to the foul system, not a surface water drain. If there is any doubt about the existing arrangement, establish this before excavating.
Set out the run from the gully to the drain connection first. This prevents the common problem of installing the gully at a convenient height, then finding there is not enough depth for the 110mm pipe to maintain a suitable fall.
For 110mm drainage, a fall around 1:80 is commonly used as a practical target, although the right gradient depends on the pipe run, discharge type and the wider drainage design. Approved Document H and the applicable drainage specification should guide the final arrangement. A pipe that is too flat can allow solids to settle; one that is excessively steep can let water run ahead of solids. Short runs are more forgiving, but they still need a consistent fall with no backfalls.
Check the finished ground level as well. The gully grate should sit neatly at the final paving, concrete or soil level, without becoming a low point that collects surface water unless it has been specifically selected and positioned for that purpose. Where it sits beside a wall, leave enough room to remove the grate and access the trap for cleaning.
Before digging, identify buried services. Water pipes, electric cables, gas supplies and telecoms ducting can all be present in the same area. Use service drawings where available and dig carefully around any suspected route.
A straightforward installation normally requires the bottle gully, compatible 110mm underground drainage pipe, the correct coupler or bend, pipe lubricant, granular bedding material and a suitable waste-pipe adaptor. You will also need a tape measure, string line, spirit level or laser level, shovel, saw suitable for plastic pipe and a deburring tool or file.
Where the gully connects into an existing drain, allow for the appropriate branch, saddle or chamber connection. The correct fitting depends on the condition and material of the existing pipework. Avoid forcing new plastic pipe into old clay or cast-iron drainage without the proper transition coupling.
Excavate a trench wide enough to work around the pipe and gully without disturbing the surrounding ground. The depth must accommodate the pipe diameter, bedding, required gradient and gully outlet level. Keep the trench base firm and even rather than cutting isolated pockets beneath joints.
Lay a bed of suitable granular material, commonly compacted pea gravel or other specified granular bedding. This supports the pipe continuously and makes it easier to fine-tune the fall. Do not bed underground drainage pipe directly onto rubble, large stones or sharp broken concrete, as point loading can damage the pipe over time.
Run a string line or use a laser from the drain connection back towards the gully position. Check the level at several points, not just at each end. A drainage pipe can appear to fall correctly while containing a shallow dip in the middle, which can hold wastewater and debris.
Dry-fit the pipework before applying lubricant and making final joints. This is the point to confirm that bends align naturally and that the gully can remain vertical. Underground drainage sockets generally need the pipe spigot inserted fully to the marked depth, with the seal lubricated using a suitable pipe lubricant. Do not use washing-up liquid, grease or petroleum-based products, as these can affect seals or attract dirt.
Position the gully on a stable, level base at the planned finished height. Depending on the product and ground conditions, this may be a compacted granular base or a small concrete surround. The aim is to prevent movement while avoiding concrete obstructing the outlet connection or access points.
Connect the 110mm outlet using the fitting arrangement specified for that gully. Some gullies have a socketed outlet and accept a pipe spigot directly; others require a separate coupling. Check that the seal is clean, lubricated and correctly seated before inserting the pipe. Push the joint home squarely rather than twisting the body out of plumb.
Use a spirit level on the gully body to make sure it is upright. A leaning gully can leave the grate sitting poorly against the finished surface and may affect how the trap or removable internal section seats. Set the height carefully now – raising or lowering it later usually means reopening the excavation.
Connect the incoming waste pipe using the correct gully adaptor or inlet. The pipe should enter cleanly, with no stress on the connection. Support above-ground waste pipe with suitable clips so its weight is not carried by the gully inlet. If the pipe passes through an external wall, maintain a slight fall towards the gully and seal the wall penetration appropriately.
Keep the gully grate clear and removable. The trap needs occasional cleaning, particularly where the gully receives kitchen or utility wastewater that may carry grease, lint or debris. Do not pave, concrete or landscape over the grate.
Also consider how the drain run will be cleared if a blockage occurs. A short, straight run from the gully to an accessible inspection chamber is preferable to several tight changes of direction. Where bends are unavoidable, use the most practical sweep and provide access in accordance with the drainage layout.
Testing before backfilling saves time and prevents an avoidable excavation later. First, visually check every joint, including the waste inlet, gully outlet and downstream pipe connections. Make sure no seal has been displaced during assembly.
Run a controlled amount of clean water through the incoming waste pipe and observe the gully and downstream connection. Water should pass away freely with no weeping at joints. Confirm that water remains in the bottle gully trap afterwards, as the retained water is what blocks drain odours.
For new drainage work, the installation may need a formal test and inspection under Building Regulations. Requirements depend on the project, location and whether the work is notifiable. Building control or a qualified drainage professional can confirm what applies to your installation.
Once the test is satisfactory, surround the pipe with selected granular material. Place and compact it carefully by hand around the sides of the pipe, bringing the support up evenly. Do not drop heavy spoil directly onto the pipe or strike the gully body with a mechanical compactor.
Continue selected backfill above the pipe before reinstating excavated material. Remove large stones, building waste and sharp fragments from the fill. Around the gully, compact in layers so the surrounding ground will not settle and pull the grate below the finished paving level.
Finish the paving, concrete or landscaped surface with the grate accessible and correctly aligned. If the gully is in an area exposed to leaves or loose debris, check it periodically and clear the grid before material enters the trap.
A correctly installed 110mm bottle gully is a simple, durable part of a drainage run, provided every component is compatible and the pipe has a genuine fall to the correct system. For trade-ready 110mm pipe, fittings, bends, adaptors and drainage accessories, Speedy Plastics provides a practical one-stop source to help keep the installation moving.